
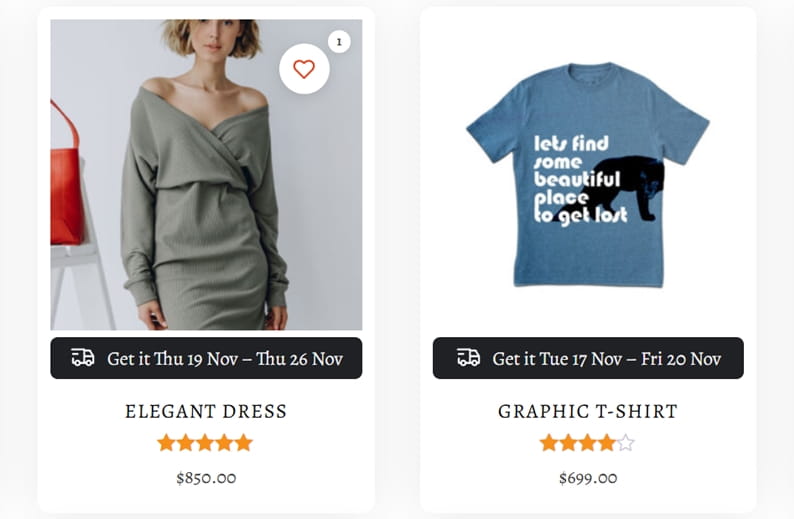
WooCommerce Estimated Delivery Date plugin is a powerful and useful tool for adding, organizing, and managing clear delivery information for your products. Unclear shipping times are one of the main reasons shoppers leave a store without buying. Our plugin replaces that doubt with a concrete promise: a realistic arrival date shown exactly where buying decisions are made. That means single product pages, shop and category grids, the cart and the checkout page. Every date is calculated from how your business really works: the weekdays you send parcels, your daily cutoff time, packing and carrier transit times, public holidays and current stock. A live cutoff countdown encourages visitors to finish their order today instead of tomorrow. Once the order is placed, the same estimate follows it into confirmation emails, the customer's account and your WooCommerce admin, so buyers and your team always work from one date. Setup takes only a few minutes, dates stay correct even on cached pages, and the plugin fits both classic and block-based WooCommerce stores.
Advanced Rules
Some products ship the same day, others need a week in the workshop. Advanced rules let you describe these differences precisely. Combine conditions such as product category, shipping zone, shipping method, stock status, customer role, cart quantity or order weight. Then add extra days, set a fixed processing or transit time, or hide the estimate where a date makes no sense.
Each rule can show its own message, so wholesale customers, oversized goods or personalized items get wording that fits their situation. Everything is set up from one clear screen, with no coding.
Seasonal Changes
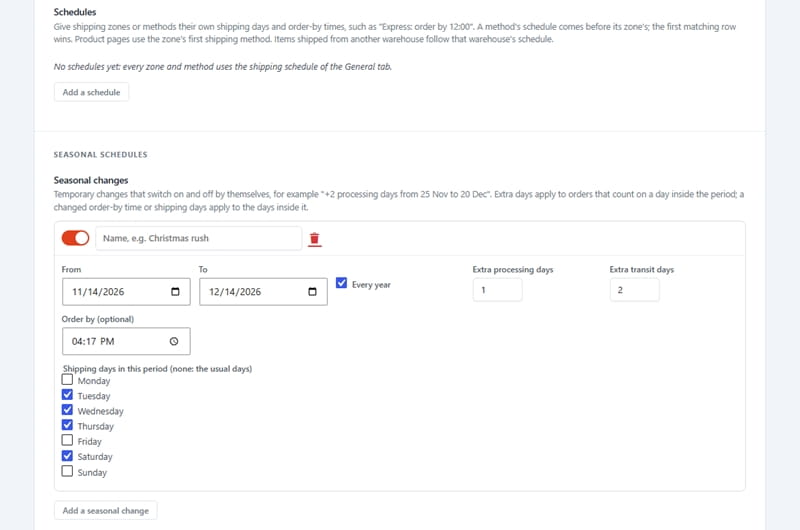
Peak seasons, summer breaks and festive weeks change how fast you can ship. Seasonal schedules let you plan these periods in advance. Pick a date range, repeat it every year if you need to, then add processing or transit days, move the daily cutoff or change your shipping weekdays.
The changes switch on when the period starts and switch off when it ends. Add one-click public holidays for many countries and "last order" countdowns before Christmas or other events, and your delivery dates stay honest all year.


Delivery Date Demo
Lead Times
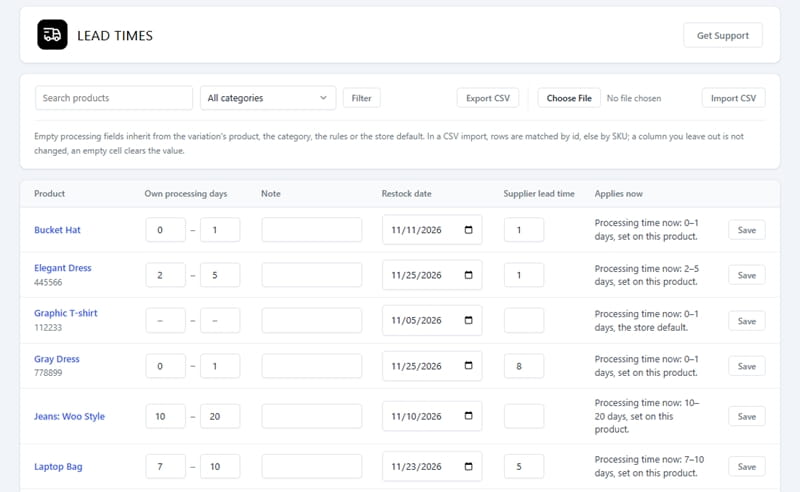
Keeping processing times accurate across hundreds of products is hard when you must open every product one by one. The Lead Times screen puts every product and variation in one searchable table. There you can edit processing days, shopper notes, ship-from location, restock dates and supplier lead times right in the row.
Large catalogs can be updated with CSV export and import, which works with Excel and other spreadsheet tools. Changes reach the storefront at once, even with popular page cache plugins active, so shoppers always see current dates.
Orders & Emails
A delivery promise only builds trust when it stays visible after checkout. The plugin calculates the date again at the exact moment an order is placed and stores it on the order and on every item. Customers see it on the thank-you page, in their account and in the WooCommerce emails you choose.
Your team gets a sortable "Deliver by" column and can adjust a date whenever plans change. With Premium, the ship-by dashboard lists orders due today or running late, sends a daily summary and emails customers when you move their dates.

WooCommerce Estimated Delivery Date Features
Everything in this plugin runs on one accurate date engine. The free version already covers the essentials: shipping days and cutoff times, holidays, and processing and transit ranges; transit times per zone, and backorder handling; a live countdown; delivery dates on product pages, shop lists, the cart, checkout, orders and emails. Premium extends it for growing stores with: cutoffs per zone, and several carrier pickups a day; warehouses and suppliers, and restock dates; seasonal schedules, a location picker and promotional bars; a ship-by dashboard, lead-time management and on-time reporting.
The WooCommerce Estimated Delivery Date plugin is available in both Free and Premium versions. The Premium version offers three licensing options: Personal (one website), Business (up to five websites), and Developer (unlimited websites). All Premium plans include the same features and differ only in the number of websites they support.
We accept Credit Cards, PayPal, and Debit Cards payments!
Detailed List of Features
- Shipping days with daily cutoff times
- Unlimited holidays and closing periods
- Separate shipping and carrier delivery days
- Processing and transit times as ranges
- Processing time per category or product
- Variation processing times and notes
- Rules by shipping class, tag or attribute
- Transit times per zone and shipping method
- Extra days for backordered products
- Live cutoff countdown timer
- Correct dates on cached pages
- Dates in shop, category and related lists
- Block, shortcode and Elementor widget
- Dates per cart item and shipping option
- Local pickup "ready on" dates
- Delivery promise saved on every order
- Dates in emails, My Account and invoices
- Sortable "Deliver by" admin column
- Editable messages with placeholders
- Preview mode and delivery simulator
- Cutoff times per zone and shipping method Premium
- Multiple carrier pickups per day Premium
- Advanced rule builder with own messages Premium
- Seasonal schedules that run automatically Premium
- One-click public holidays by country Premium
- Warehouses, suppliers and dropshippers Premium
- Restock dates and supplier lead times Premium
- Holiday "last order" countdowns Premium
- Sitewide cutoff announcement bar Premium
- "Delivering to" location picker Premium
- "Get it faster" shipping upgrade line Premium
- Delivery times table block and shortcode Premium
- Design gallery and countdown styles Premium
- Visual delivery timeline & On-time delivery report Premium
- Ship-by dashboard with late alerts Premium
- Bulk date changes with customer emails Premium
- Split-delivery summaries Premium
- Dates on quotes, repeat and manual orders Premium
- Lead-time manager with CSV import/export Premium
- Priority Support Premium
Video Manual
Clear delivery information is one of the simplest ways to raise conversions and reduce support tickets. When shoppers know when their parcel will arrive, they hesitate less, abandon fewer carts and send fewer emails asking about their order. The WooCommerce Estimated Delivery Date Plugin by WpDevArt gives you that clarity without a complex setup. Start with the free version to show reliable dates across your store. Upgrade to Premium when you need warehouses, seasonal planning or order monitoring. Install it today and make every product page a confident delivery promise.
User Manual
Step 1: Installing and activating the free plugin
- Make sure WooCommerce is installed and active on your site.
- In your WordPress dashboard, go to Plugins → Add Plugin and search for WpDevArt Estimated Delivery Date for WooCommerce.
- Click Install Now, then Activate. A new menu called WDA Delivery appears in your dashboard.
Step 1.1: Installing and activating the Premium add-on
- Check that WooCommerce and the free plugin are installed and active. The Premium add-on works on top of the free plugin, so both must stay active.
- Download the Premium zip file from your WpDevArt account after purchase.
- Go to Plugins → Add Plugin → Upload Plugin, choose the zip file and click Install Now.
- Click Activate Plugin. The new Premium tabs and screens (Ship-by dashboard, Lead times, On-time report) appear under WDA Delivery.
- To update later, upload the newer zip the same way and choose Replace current with uploaded. Your settings stay as they are.
First settings
Open WDA Delivery → Settings. The plugin starts in preview mode, so only shop managers see the dates while you set things up. On the General tab:
- Shipping days and order-by times: tick the days you send out orders and set the latest order time for each day. Orders placed later count for the next shipping day.
- Days your carrier delivers: tick the days your carrier delivers, for example Saturday as well.
- Processing time: the number of shipping days you need to pack an order. Use 0 for same-day dispatch.
- Transit time: the days your carrier needs, as a range such as 2 to 4.
- Products on backorder and Extra days for backorders: choose how backordered products are dated.
- Click Save Changes.
Holidays and closed periods
- Open the Holidays tab.
- Add a single day or a date range, and choose whether you don't ship, the carrier doesn't deliver, or both.
- Tick Repeat every year for fixed holidays, then click Save Changes.
Transit times per shipping zone
- Open the Shipping Zones tab. All your WooCommerce shipping zones and methods are listed.
- Enter a transit time for a zone or a single method. Leave a field empty to use the default transit time.
- Under Shopper location, choose which zone is used before the shopper's address is known, then click Save Changes.
Processing times for categories, products and variations
- Categories: go to Products → Categories, edit a category and set its processing time.
- Products: edit a product and open the Delivery tab in the Product data box. Set the fewest and most processing days, an optional Note for shoppers, or tick No delivery estimate.
- Variations: each variation has the same fields. To set all variations at once, use the variation bulk action Set processing time.
- Many products: use Quick Edit or Bulk Edit in the products list.
Rules
- Open the Rules tab.
- Under Processing time rules, add a rule by shipping class, tag, brand or attribute, and choose how many days it adds or sets.
- Under Products without an estimate, choose the categories that should not show a date, then click Save Changes.
Display and messages
- Display tab: choose where the date shows on product pages and in product lists, the dates in the cart and checkout, the date format, the countdown and the style.
- Messages tab: edit every text shoppers see. Use placeholders such as {countdown}, {date} and {ship_date}. The live preview updates as you type.
- To show the date in another place, use the Delivery estimate block, the Elementor widget or the shortcode
[wpdevart_edd_estimate id="123"](replace 123 with the product ID).
Orders and emails
- Open the Orders & Emails tab and choose where the date appears: the thank-you page, the My Account orders list, the admin Deliver by column, and which WooCommerce emails and invoices include it.
- To change the date of a single order, edit it in the Delivery promise box on the order screen. An order note records the change.
Checking the dates and going live
- Open the Tools tab and use the Delivery simulator. Pick a product, a date and time, and a destination to see the estimate and every step behind it.
- Visit a few product pages while logged in to check the dates.
- Click Go live in the preview notice at the top of the settings page. Now every visitor sees the dates.
Premium: schedules and holidays
- Schedules tab → Order-by times per shipping zone and method: give express or local methods their own cutoff times, and add more than one carrier pickup per day.
- Schedules tab → Seasonal schedules: add a date range with extra processing or transit days, another cutoff time or other shipping days. It turns on and off by itself.
- Holidays tab → Public holidays: choose a country to add its national holidays for every year.
Premium: warehouses, suppliers and restock dates
- Open the Warehouses tab and add your warehouses, suppliers or dropshippers, each with its own times, cutoffs and holidays.
- Assign a location to a category, a product or a variation.
- Under Restock dates, choose how products with an expected restock date are shown, then click Save Changes.
Premium: advanced rules
- Open the Rules tab → Advanced rules and click to add a rule.
- Choose the conditions: categories, shipping zones, shipping methods, stock status, customer roles, cart quantity or weight.
- Choose what changes: add or set processing or transit days, or hide the estimate. Optionally add a message and a note.
- Turn the rule on and click Save Changes.
Premium: designs and promotions
- Display tab → Designs: pick a ready-made design and a countdown style (circles, flip cards or progress bar), or upload your own icon.
- Display tab → More on the product page: turn on the Delivering to location picker, the faster shipping option line and the delivery timeline.
- Promotions tab: turn on the Sitewide order-by bar, and add Holiday "last order" dates such as Christmas.
- To show all zones and transit times on a page, add the Delivery times table block or the shortcode
[wpdevart_edd_delivery_table].
Premium: orders, dashboard and reports
- Orders & Emails tab: set the split-delivery summary, dates for orders created outside the checkout, and the daily Ship-by alerts email.
- WDA Delivery → Ship-by dashboard: see the orders that must ship today, are at risk or are late. Select orders to move their dates, and customers are emailed the new dates.
- WDA Delivery → Lead times: edit processing times, notes, locations, restock dates and supplier lead times of all products in one table, or use Export and Import with a CSV file.
- WDA Delivery → On-time report: see how often orders shipped and arrived on the promised dates, by shipping method.
Tips
- Set your store time zone under Settings → General in WordPress before you set cutoff times.
- Use the Delivery simulator whenever a date looks unexpected: it shows exactly which setting changed it.
- If you use a page cache plugin, keep Clear the page cache after changes turned on (Tools tab), so shoppers see new settings at once.
- To move settings from a staging site to your live store, use Export settings and Import on the Tools tab.