Using the specific design and layout for each category has become a common method adopted by webmasters to make their site unique and eye-catching. This is because WordPress has a powerful template system that allows users to use the different template for different section of the whole site.
In this case, you can create some customized templates for your categories coming with the particular features, such as showcasing the post excerpts, adding category images, displaying the publish dates of the posts, placing the same category introduction, adding the static text above posts, etc. The choices are unlimited, and you can customize each of your categories freely (also, check our WordPress Countdown plugin).
Before telling you how to create WordPress category template, we’d like to tell you something about WordPress template hierarchy.
WordPress Template Hierarchy
WordPress refers to a category template based on the default hierarchical order: category-slug.php < category-id.php < category.php < archive.php < index.php. For instance, if the slug of the category in question is “product”, then category-product.php will be used for the Product category. If WordPress fails to find the slug template, it will look for the category-id.php file. In the case that both of the two files are unavailable, it will check for the generic category.php file, and so on (also, check this useful tutorial - What is PHP.INI?).
Create Category Template
To make this explanation clear and easy-to-understand, we have made an example assuming your website has a category called Product, and you want to create a unique design for this category that is different from others.
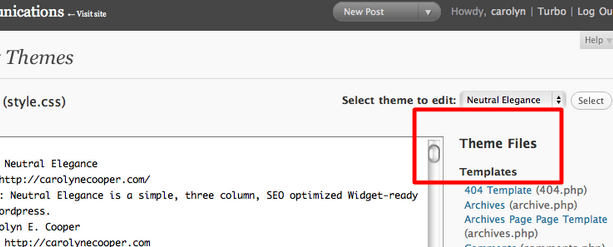
Firstly, you need to copy the content of your default category.php file. This file can be found in the folder of wp-content/themes/your current theme name. Also, you can check the file content from your WordPress admin panel. After logging to the dashboard, you can go to Appearance < Editor, and click category.php from the list of theme files appeared on your right hand (also, you can check this useful post - How to Modify PHP.INI with cPanel?).

Then, you need to copy all the contents included in category.php file and paste them into a new file using a text editor. Don’t forget to save this new file with the name of category-product.php. There is a special note that the name of this file must start with the word “category”, and the descriptive word behind the hyphen symbol needs to be the same as the category name.
The next step is to create a new category template by connecting this file to your website using your favorite FTP client. Note that the file needs to be located at wp-content/themes/your current theme name of the theme directory. After that, any changes you make to this template will only appear on the product category. In the same way, you can also customize some other of your categories as you wish (also, you may like to check the Best WordPress Shortcode Plugins list).
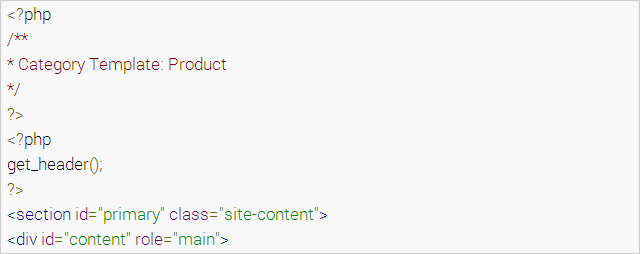
Remember that at the very top of the file, before any coding stuff, you need to put the appropriate name for your template like the example showed in the following.

Customize the Category Template
Now, it’s time to make some customizations. You only need to edit this new template file using PHP, and save the changes. We have listed some common customizing examples in below, with which you can gain some design aspirations (also, you can check our WordPress Pricing table plugin).
Add the same introductive text above posts

Add different texts on the different category

Put category name at the top of the page

Display the post excerpts or the full posts
![]()
or
![]()
Replace the post content with a linked image

Decide which category can be seen on any page

