Today we will check how to install phpList for better email listing and management. The E-mail is an integral part of our daily life and most people can’t work without e-mail. So almost every webmaster knows that e-mail is very important for their website marketing and management. The phpList is a nice and user-friendly tool that helps webmasters to manage the mailing lists easily.
How about phpList
To put it simply, phpList can be regarded as an advanced newsletter manager that is developed for the spread of information, such as newsletters, publicity lists, notification and advertising mails for subscribers. It is a PHP tool that makes use of MySQL database to store the data and information (also, you can check our WordPress Pricing table plugin).

- This software is distributed under GPL license, so people can download, install, and use it for free.
- phpList is powerful enough to manage mailing lists with hundreds of thousands of subscribers. The management includes the subscription registration, personal data exchange, and cancellation request, etc.
- Users are allowed to determine the registration requirements at any time, such as the country of residence, language, age, gender, profession, and many more.
- The public interface has been translated into 35 languages, eliminating the possibility of the language barrier significantly. (also, check our WordPress Countdown plugin)
- The information can be sent constantly from your web server, even if you shut down your computer. In addition, there will be no duplicate or missing messages.
Install phpList Automatically
If you are managing a website using the hosting service, then you are very likely to find the 1-click script installer in any rich-featured hosting package, with which you can install phpList easily and effortlessly. Here, we set Softaculous – a popular script library and installer offered by almost all the reliable web hosts like InMotion Hosting – as an example (also, check this comparison post – BlueHost vs DreamHost – Which is the Better WordPress Hosting).
Firstly, you need to login to your cPanel and scroll down to find the Softaculous icon that is located under the Software/Service section. After clicking it, you can be directed to the app library of Softaculous. In the left hand column, there is a Mails section available. You can click it and find phpList icon in the drop-down menu (also, check this nice WordPress YouTube plugin).
![]()
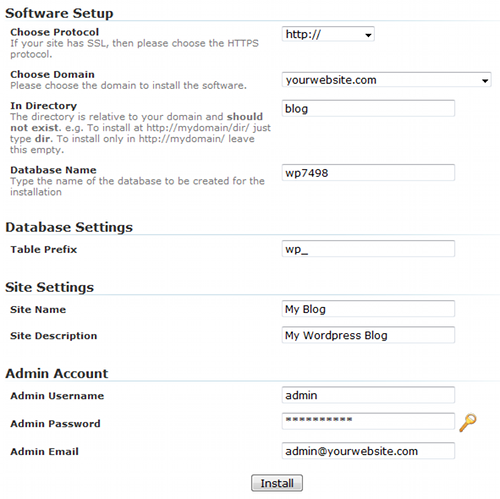
Then, you need to hit on the Install phpList Now button which is at the top-right location of the whole page. After that, you can see a software setup page helping you configure how to have this tool installed on your website.

- Choose Protocol – You’d better leave it at the default of http://. If you utilize a SSL certificate on the website, then you can choose the https// option.
- Choose Domain – Enter the domain name to install this software. (also, check our WordPress Booking Calendar plugin)
- In directory – Enter the directory that you’d like to install phpList.
- Database Name – Type the name of the database that phpList will create.
In addition to these basic settings, you can also configure some advanced options as you want, such as Cron Job, site name, site description, table prefix, admin username, admin password, and admin e-mail.
After finishing all of the information required, you can click the Install button. The whole installation process runs for a few minutes. Once you have gotten the congratulation message, then it means you have phpList installed successfully, and can use it at any time (also, check this useful tutorial – What is PHP.INI?).
Install phpList Manually
In addition to leveraging the power of script installer, you can also install phpList on your own. Note that this requires a certain level of advanced knowledge, so you’d better choose the first method if you are new to this field.
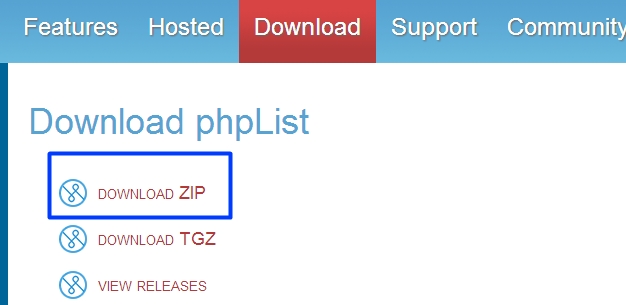
In the very beginning, you need to download this tool from phplist.com. Click on the ZIP link like the image showed in below. Note that 3.0.5 is the latest version for phpList that has been released since October 1st, 2013.

In the Source Forge, you can wait a few minutes for the download count-down, or simply click on the direct link or mirror link to begin the download. Then, you need to extract the downloaded file and locate it to a local folder of your computer. Generally, this file names as phplist-3.0.5.zip (also, you can check this useful post – How to Modify PHP.INI with cPanel?).
The next step is to create a MySQL data to store all the phpList settings. You can do this within your cPanel. After logging in, you need to click on MySQL Database Wizard under the Databases section. Then, type a name for this newly created database, let’s say phplist in this case.
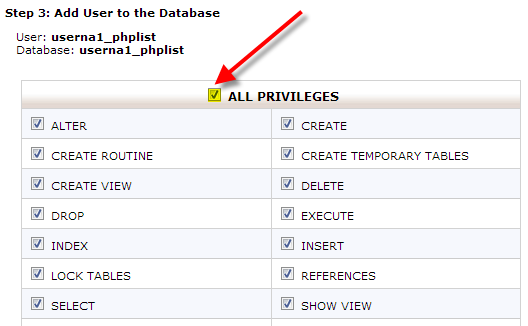
In the next step, you are required to create the database user with the username and password. Note that you can never use some common words due to the security concern. Now, you can click the Create User button. Remember to mark the box before ALL PRIVILEGES.

You can now upload the phpList files to your web server using your favorite FTP client. Generally, you’d better locate this file into the /public_html/ directory on the server (also, check The 50 Best WordPress Plugins).
The final step is to enter the database credentials in the config.php file. You can find this file from cPanel < Files < File Manger, and enter the following code into the script. Don’t forget to click the Save Changes button on the left-top of the page.

